Navigating the Main Panel
⇐ Table of Contents{{#if: Finding Your Way Around| | Finding Your Way Around }}{{#if: | | [[{{{3}}}]] }}{{#if: | | [[{{{4}}}]] }}{{#if: | | [[{{{5}}}]] }} | Navigating the Main Panel{{#if: ADempiere Application Menu| | ADempiere Application Menu }} ⇒
Contents
Main Panel
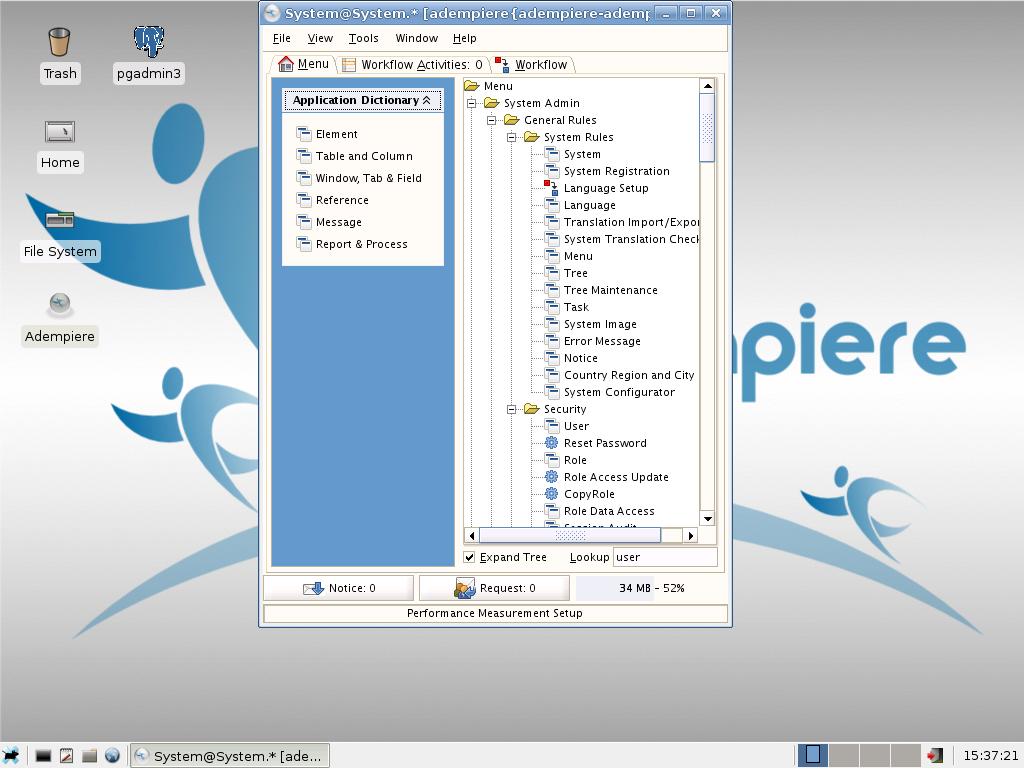
When you log into the ADempiere Client for the first time, you will see a window which is divided into 3 sections:
- Across the top you have the application menu bar (File, Edit, ....)
- Below that is a tabbed panel with three or four tabs: Performance, Menu, Workflow Activities and Workflow. The Performance tab and dashboard will only appear if performance measures are set up. The dashboard will display performance indicators and charts.
- Under this pane are two buttons (Notice and Request) which display the user's current number of new notices/requests, and a bar that displays the current memory usage.
At the very top of the window, the window title will show the user, organization and warehouse being used and the connection in the form of [App Server{DB Server-database name-database user}].
Finally there is a status bar at the very bottom of the window where error information and instructions are displayed.
The Application Menu
The menu bar across the top of the window appears on most windows. A few items in the menu change depending on the available actions, but generally, the menu functionality is consistent across the application.
For more information, see the ADempiere Application Menu page.
Using the ADempiere Menu Tree
When you click on the Menu Tab in the tabbed panel, the ADempiere menu tree will appear.
The right-hand pane of the menu tab is the main application menu, which represents all windows and processes to which the logged in user has access, organized into a categorized tree. It is quite busy by default but it can be reduced to a small and very manageable size for a particular user and role.
You navigate through the menu by expanding the branches of the menu tree by clicking on a category (eg Quote-to-Invoice) and then clicking on the window or process that you would like to open.

Note: A single click on a menu tree item is sufficient to open that item. If you are navigating the tree by mouse, <Enter> will open the highlighted item.
On its left is an easily customizable shortcut bar. Frequently used windows can be added to the shortcut bar by selecting the corresponding menu item and right-clicking (simply right-clicking over the item doesn't work), then choosing Add to Bar from the pop-up that appears.
- Below the menu, at the right hand edge of the window, is a yellow text box which enables you to search the menu.
- Simply type in any part of the menu item you're looking for and press enter -- the menu will open to a corresponding match -- continue pressing Enter to scroll through all available matches and then Ctrl-Enter to actually open a selected item.
Menu Icons
In the menu tree, the following icons indicate the types of processes that can be performed.
| Open new Window | |
| Start background Process | |
| Open Workflow Window | |
| Open Report |
Next Steps
- Learn about the ADempiere Application Menu
- Learn about Navigating through most windows
For Developers
The software that creates the main panel can be found in:
- client/src
- org.compiere.apps.AMenu.java
